

How to Change a Light Fixture and Plan Kitchen Island Lighting Like a Pro
Renewing your home through thoughtful lighting, one fixture at a time.
Written by Janeca Racho, 54kibo Contributor
Reviewed by 54kibo Editors
Renovation often begins long before walls come down or finishes change. In many homes, renewal starts quietly, with a decision to update how a space feels rather than how it looks. Lighting is often the first place that shift becomes visible.
Learning how to change a light fixture is a small but meaningful step in that process. Replacing light fixtures can refresh scale, restore balance, and subtly signal that a home is moving into a new season. Whether you are changing out a hallway ceiling light or planning pendant lighting over a kitchen island, these updates shape how a space functions and how it supports everyday life.
This guide covers both sides of that transformation: how to replace a light fixture safely, and how to plan kitchen island lighting with the spacing, sizing, and placement designers rely on. The goal is not simply to install something new, but to create lighting that reflects intention during a moment of renovation and renewal.
Before You Begin: What to Check Before Changing a Light Fixture
Lighting sets the emotional temperature of a room. A warmer glow can soften hard edges and invite lingering, while a brighter, cooler light sharpens focus and energy.
As homes evolve, lighting can help transform the feel a space evokes. It becomes the quiet tool that can make a room feel calmer, more open, or more grounded without changing a single wall or piece of furniture.
Before changing a light fixture, a few technical details determine whether installation will be smooth and the final result well proportioned. These fundamentals protect both safety and long-term performance.
- Junction box rating: Confirm that the box can support the fixture’s weight.
- Electrical compatibility: Check bulb type, wattage limits, and dimmer compatibility.
- Ceiling height: Determines pendant drop and overall scale.
- Clearance zones: Especially important when replacing a light fixture over islands or walkways.

How to Replace a Light Fixture (Step-by-Step)
Upgrading lighting does not always require a contractor. For many homeowners, learning how to replace a light fixture is one of the most approachable design projects. That is, as long as you make sure safety comes first.
This same process applies whether you are replacing a light fixture in a hallway or installing pendants in the kitchen, where lighting often has the greatest visual impact.
Step 1: Shut off the power
Turn power off at the breaker panel before changing a light fixture. Never rely on wall switches alone.
Step 2: Remove the existing fixture
Lower the fixture carefully, disconnect the wires, and label them if needed. This applies whether you are replacing a chandelier, pendant, or ceiling light.
Step 3: Wiring a light fixture
When wiring a light fixture, match black to black (hot), white to white (neutral), and connect copper or green to ground. Secure all connections with wire nuts and electrical tape.
Step 4: Install the mounting bracket
Attach the mounting plate firmly to the junction box. Proper light fixture installation depends on this hidden support.
Step 5: Secure and test
Tuck wires neatly, attach the canopy, install bulbs, and restore power.
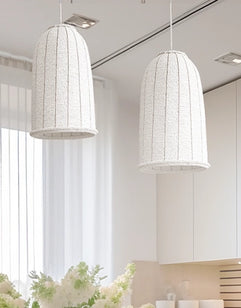
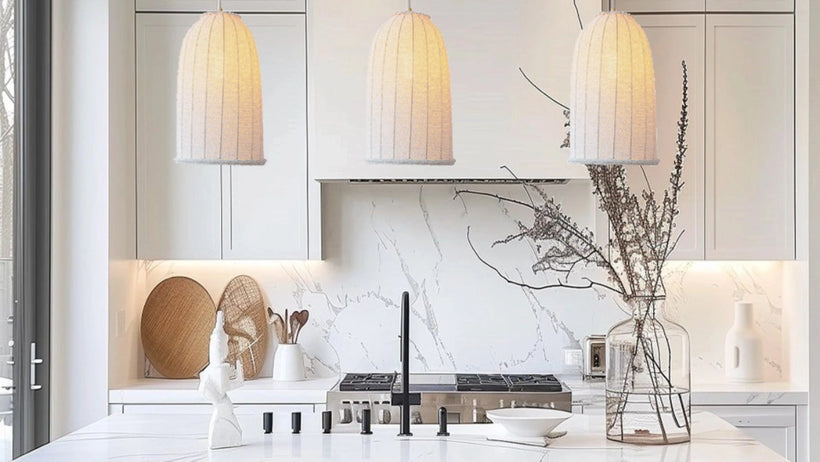
Kitchen Island Lighting: Technical Rules Designers Follow
Changing a light fixture in the kitchen is equal parts function and design. Swapping a flush mount for pendants or updating island lighting can completely shift the tone of the space.
Kitchen island lighting, however, requires precision. Designers rely on clear spacing and sizing rules to avoid glare, shadows, and overcrowding while ensuring balanced illumination across prep and gathering zones.

How Much Space Between Pendant Lights?
Changing a light fixture in the kitchen is equal parts function and design. Swapping a flush mount for pendants or updating island lighting can completely shift the tone of the space.
Kitchen island lighting, however, requires precision. Designers rely on clear spacing and sizing rules to avoid glare, shadows, and overcrowding while ensuring balanced illumination across prep and gathering zones.
How Much Space Between Pendant Lights?
Correct spacing ensures that pendants feel intentional rather than improvised. If you are wondering how much space between pendant lights is correct, these guidelines prevent visual clutter and uneven light distribution.
- Measure spacing center to center
- Allow 24–30 inches between pendant lights
- Keep fixtures at least 6 inches from the island edge
How many pendant lights over 8 ft island?
Use 2 large pendants (12–15 inches) or 3 medium pendants (8–10 inches).
How many pendant lights over 7 foot island?
Typically 2 pendants, unless using very slim fixtures.
What Size Pendants for an 8 Foot Island?
Ceiling height should always guide final proportions. If you are deciding what size pendants for 8 foot island installations work best, scale matters more than style.
- Large pendants (12–15 inches): 2 fixtures
- Medium pendants (8–10 inches): 3 fixtures
- Mini pendants (6 inches or smaller): 3–4 fixtures
2 vs 3 Pendant Lights Over Kitchen Island
The 2 vs 3 pendant lights over kitchen island decision comes down to rhythm and proportion.
- Choose 2 pendants for bold, oversized designs
- Choose 3 pendants for slimmer or more minimal fixtures

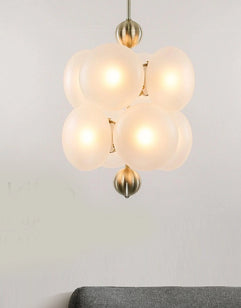
Pendant Lights vs. Globes for Lighting Fixtures
When choosing between pendant lights and globes for lighting fixtures, consider both performance and mood. Pendant lights often introduce sculptural form and layered materials, making them ideal when lighting should anchor the design visually.
Globes for lighting fixtures shape the light itself. Clear globes provide bright task lighting, while frosted or textured globes diffuse light for a softer, more ambient effect. Many kitchens benefit from blending both approaches to balance form and function.
Common Mistakes When Replacing Light Fixtures
Technical accuracy is what allows lighting to feel effortless, so it’s best to avoid these frequent issues when changing a light fixture:
- Ignoring island measurements before selecting fixtures
- Incorrect spacing or hanging height
- Relying on a single light source
- Overlooking dimmer compatibility and bulb temperature
Lighting as Part of Renewal
Knowing how to change a light fixture is both a practical skill and a design decision. From how to replace a light fixture safely to choosing between 2 vs 3 pendant lights over kitchen island layouts, good lighting depends on technical clarity.
During moments of renovation and renewal, lighting often becomes the first visible sign of change. When spacing, scale, and wiring are handled with care, each update supports how you live now—and how your home continues to evolve.
Continue Reading
If this resonates, explore related articles on lighting, renovation, and thoughtful design.
15 Light Fixtures That Transform How Your Home Feels (And How to Choose the Right One)

Janeca is a trained journalist and storyteller with a background in public relations, media, and corporate communications. She now writes freelance, drawn by the freedom to travel and explore her craft. When she’s not writing, she finds inspiration in design styles from around the world, curating boho-meets-coastal pieces for her beachside home.


Comments