How to Style Kitchen Shelves Like a Designer: Why Most Shelves Fail Before Styling Begins
Kitchen shelves fail more often from planning mistakes than from styling choices.
Written by Beth Diana Smith, Interior Designer
Reviewed by 54kibo Editorial Team

About the Designer: Beth Diana Smithis an interior designer known for her bold, eclectic style and layered, luxury-driven spaces. Based in New Jersey and working with clients across the country, Beth blends vibrant color, custom details, and curated finishes to create homes that feel as personal as they are polished. Her work has been featured in Elle Decor, The Wall Street Journal, Business of Home, and Better Homes & Gardens.
When I’m styling a space, I always think about the balance between form and function. Nowhere does that balance matter more than in the kitchen, a room where beauty and practicality have to work together every single day. Whether I’m working with floating kitchen shelves, a built-in kitchen wall shelf, or open shelf kitchen designs, I treat shelves as both design elements and working storage.
However, I’ve learned over time that most kitchen shelf problems don’t come from styling. They come from how people think about shelves in the first place. Many clients start with kitchen shelf decor ideas, pulling inspiration from images or trends, assuming that the right objects will automatically create a polished result. In practice, shelves rarely fail because of what’s displayed on them. They fail because the planning underneath was never resolved.

Seeing Shelves as Structure, Not Decoration
The most common misunderstanding about kitchen shelves is that they’re primarily decorative. In reality, shelves are part of the kitchen’s working layout. They shape how you move, where you reach, and how efficiently you use the space. Before I think about styling kitchen shelves, I always start by understanding what the shelves are meant to do. Are they holding daily dishes? Serving pieces? Pantry items? Decorative accents? The answer changes everything.
Open shelves above a prep zone behave differently from a kitchen wall shelf near the stove. Deep shelves demand different organization than shallow ones. And mixing storage with display requires more discipline than people expect.
When shelves are treated as decor first, they almost always become cluttered, awkward, or frustrating to use. When they’re treated as part of the kitchen’s working system, styling becomes much easier.
Designing the Layout Around Daily Use
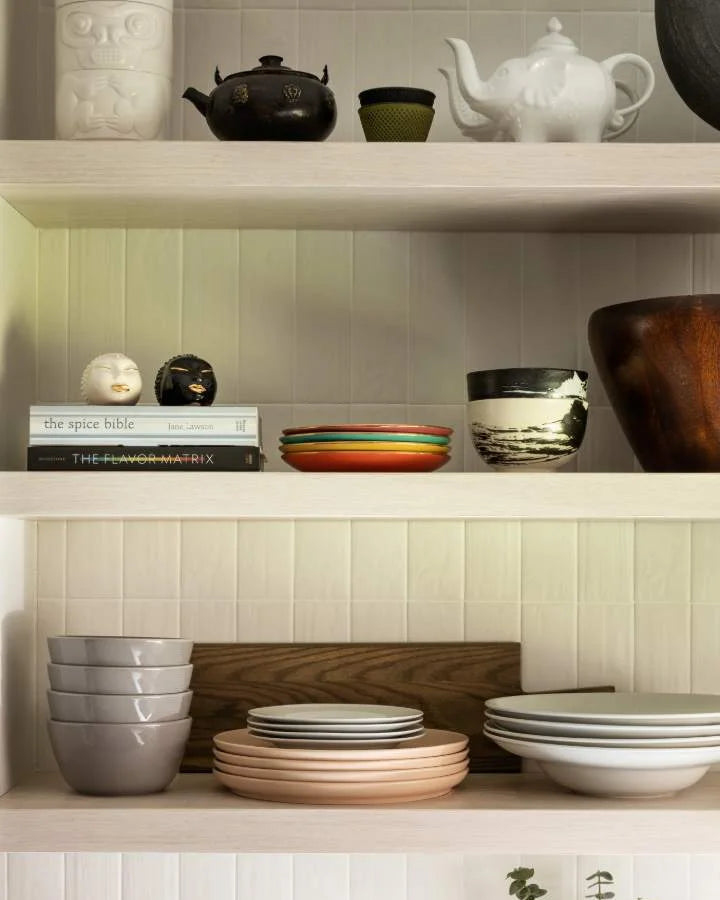
Before I place a single object on a shelf, I map the layout around daily habits. Where do you prep? Where do you pour? Where do you reach most often? These questions determine which shelves hold functional items and which can hold purely decorative ones. In my experience, the most important shelves are usually the lowest ones, because they carry the pieces used every day.
Plates, bowls, glasses, and frequently used serving pieces belong where they can be reached easily. Higher shelves can hold lighter-use items, books, or accents that don’t interrupt the flow of work. This step is where most kitchen shelf ideas succeed or fail.
Editing Before You Ever Style
One of the most important parts of styling kitchen shelves happens before anything is styled at all. I always begin by taking inventory—pulling out everything that might live on a shelf, from everyday dishes and favorite mugs to cookbooks, bowls, and a few plants—then editing from there. Not everything deserves shelf space, and learning what to leave out is often more important than deciding what to include.
Height, depth, and proportion all matter more than people expect. Some pieces simply don’t belong on shelves, no matter how beautiful they are. This is where many people struggle, because the instinct is to display everything. In practice, shelves work best when they show only what truly fits the space and the way the kitchen is used.
Clutter is the enemy of both beauty and efficiency. Well-edited shelves are less about arranging objects and more about refining the balance between function and form.
When I actually begin styling kitchen shelves, I always work from the most functional level upward. The bottom shelf comes first, because it carries the most weight visually and practically. I place the pieces I use daily there, adjusting spacing, checking heights, and making sure nothing feels cramped or unstable.
The middle shelves usually take overflow from below. This is where balance matters most. Too many items and the shelf feels crowded, while too few and it feels unfinished.
Only after the functional shelves are working do I turn to the top shelf. This is where personality enters more freely, but even here, restraint matters. Every object should earn its place.
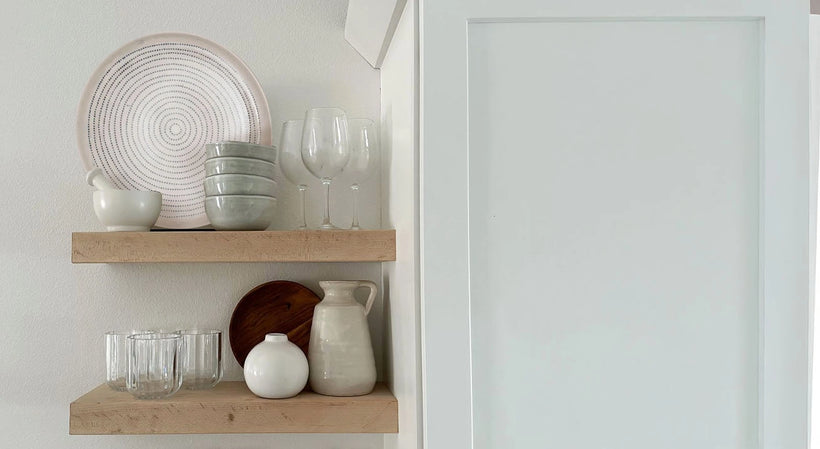
Letting the Shelves Breathe
One of the hardest concepts for people to accept is white space. Negative space is not wasted space because it allows each object to feel intentional. When shelves feel off, the problem is often not what’s missing, but what hasn’t been removed. I always step back and look for areas that feel heavy, unbalanced, or visually noisy.
Refining Through Repetition
Styling is rarely a one-time process. I almost always step back, move things, swap pieces, and repeat the same adjustments several times before the shelves finally settle. Sometimes what’s missing isn’t a new object at all but something already in the house, waiting on another shelf or in storage. (This is why I always encourage clients to “shop” their own homes before adding anything new.)
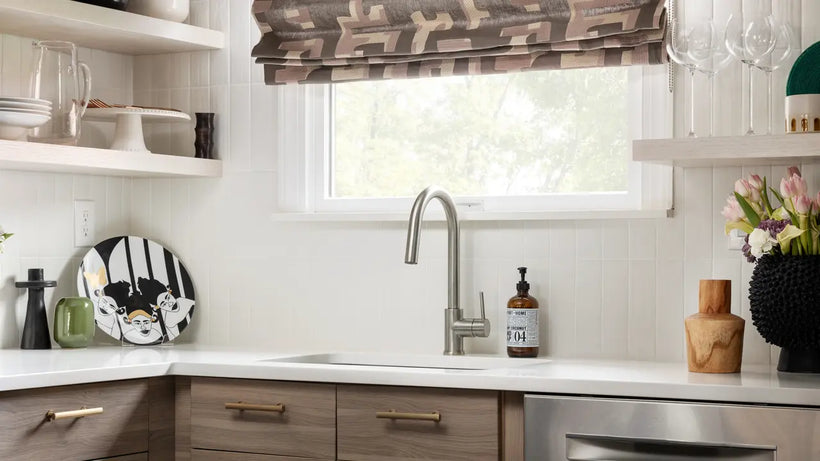
Extending the Logic to the Countertop
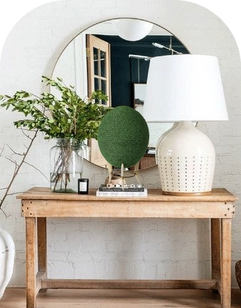
Once the shelves are working, the countertop underneath becomes part of the same system. Here, form must follow function even more strictly. I always begin by deciding how much prep space is truly needed. Then, I anchor the counter with just a few functional pieces: a bowl, a book, a cutting board, a vase.
Minimalism matters here. The more you place on the counter, the more visually cluttered the kitchen becomes. Grouping in odd numbers, varying heights, and layering thoughtfully can add depth without sacrificing workspace.
Why Purpose Always Comes First
Over time, I’ve learned that the best kitchen shelves are not the most styled ones but the ones that are planned with purpose. When you understand how to organize kitchen shelves around daily habits, editing becomes easier, styling becomes lighter, and the shelves begin to support the kitchen rather than compete with it.
Likewise, it’s important to keep in mind that beauty and function are not opposites. And when shelves are designed with both in mind, they quietly become one of the most powerful elements in the kitchen.
Continue Reading
If this way of thinking about kitchen shelves resonates, the following articles explore related ideas you may find useful.
Kitchen Decor Ideas: How to Think About Style and Function Before You Change Anything

Based in the New Jersey and New York area, Beth Diana Smith brings a distinct point of view to interior design—one that’s layered, expressive, and rich with meaning. Her spaces are known for their bold use of color and pattern, but it’s her thoughtful curation of art, texture, and cultural storytelling that makes them truly unforgettable. Every element she selects is chosen with purpose—each one contributing to the narrative of the home and the people who live in it.


Comments